1992 - 1996 Corvette Optispark Dissection and Replacement
By Mike Chaney, F-Body Listserv
This article was written by Mike Chaney who is a contributor to the F-body Listserv. He has done an excellent dissection of an Optispark distributor which appeared on 1992 - 1996 LT1 Corvettes. Below, he describes the replacement of an Optispark distributor on his 1995 Pontiac Trans Am. Keep in mind that the replacement *is* conducted on a TA and not a Corvette so there may be differences.
The photos on this page are of a 95 Optispark. The unit is held together with inverse (male) Torx screws. The easiest way to remove them is to get an old Torx screw out of something and hold the screw with vice grips. You can then fit the screw over the head and turn it. All screws have been removed in these photos to make access easier. This page is for your information only. What you do with the information here is up to you. I figured a lot of people would benefit from seeing one of these things opened up.

Above is the Optispark with the outide facing the camera (the side you see from the front of the engine).

When we flip the Optispark over, we can see the center shaft with the three large recessed (circular) grooves that fit over three bolts when installed. The small indexed groove fits over a single pin (it will only go on one way).
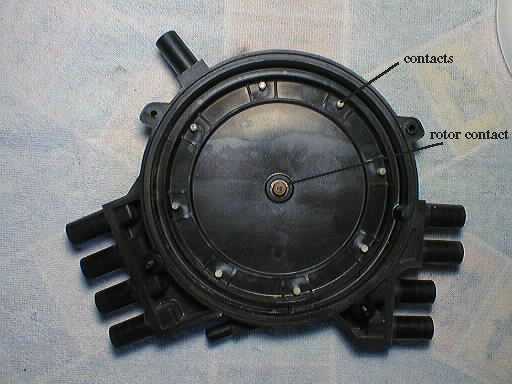
When the four inverse (male) Torx screws are removed, the outer half of the Optispark reveals all eight contacts and the rotor contact in the center.

The other half (inner part facing the engine) reveals the rotor (attached with two very small Torx screws). The rotor spins freely.
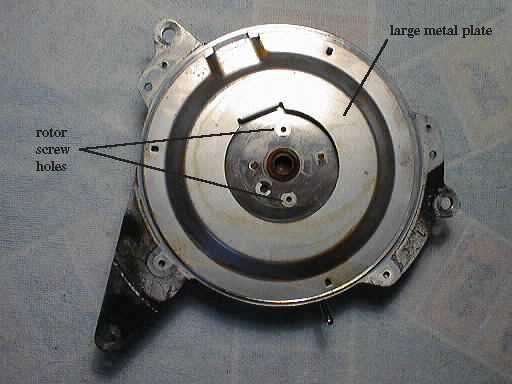
With the rotor removed, the plastic cover behind the rotor can be easily pried up to reveal a large metal cover (marked metal plate in the photo).
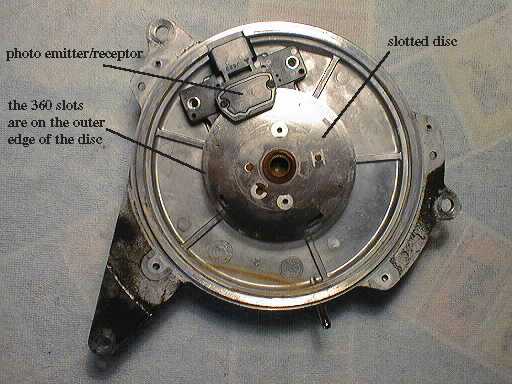
The large metal cover comes right off to reveal the real guts of the beast. It is difficult to see the slots on the slotted disc because they are so tiny. The slotted disc passes through a slot in the photo emitter/receptor.

The slotted disc (very thin) pops right off, revealing another thin disc underneath. Both of these are held on by the rotor bolts.
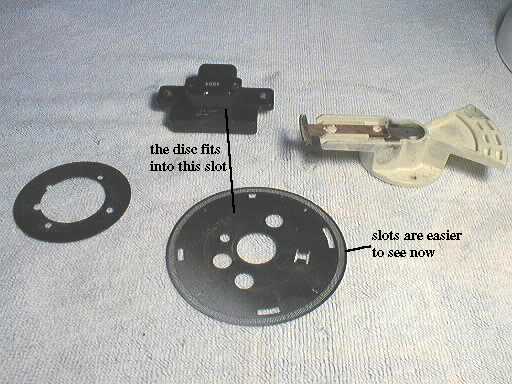
A closeup of the main guts of the Optispark makes it a little easier to see the slots in the disc, and how the disc fits into the slot in the photo emitter/receptor.
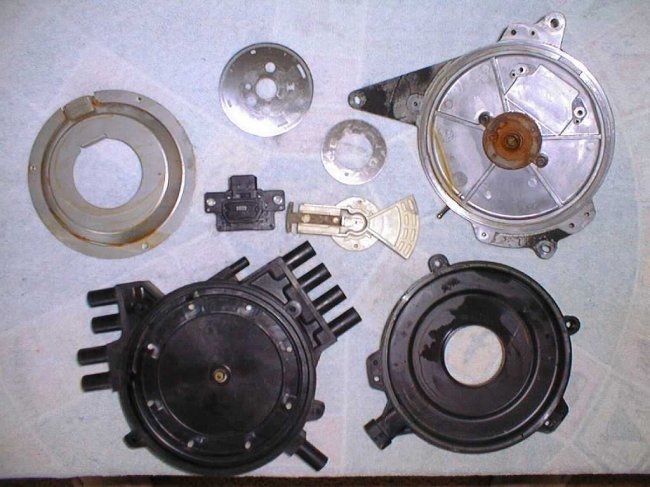
Well, there it is. All of the parts in their glory. I leave you with my email to the f-body mailing list for the gory details on removal and installation, cleaning, etc. Enjoy!
Well, yesterday was a rough day. My Opticrap went south completely on my 95 T/A, so I went to the dealer and bought one ($343). I did take the old one apart (I'll have pics later) but decided that with as much stuff as I had to take off that engine, I wasn't going to take the chance that I might have to do it all twice. Actually, for what had to be done, it didn't take all that long. Here's the scoop. Before starting, remove the negative terminal on the battery. First, you need to raise the car to get underneath. You'll notice that the harmonic balancer/pulley is the first thing that is in the way. You'll have to swing the tensioner out of the way from underneath and remove the belt. Remove the three bolts on the harmonic balancer pulley and pull the pulley (I used a puller). Next, remove all plug wires and the two vent hoses (if equipped - 95+). Next, remove the intake tubing from the throttle body to the air cleaner. I just unscrewed the one big hose clamp at the throttle body, disconnected the MAF electrical connector and air pump hose, and pulled the whole thing as one unit. Next, drain the radiator and remove all hoses from the water pump. A few connectors also have to get disconnected during this procedure, like the coolant temp sensor, IAT, Optispark, etc. Next, remove the water pump, because that's also in the way. There are six bolts holding the water pump (14mm). When you go to remove the middle bolt on the driver's side, you'll notice that to remove this bolt, you have to remove the electric air pump. There are two large bolts (14mm) and three small ones (10mm). Let the air pump hang. Remove the air pump bracket, held in place by the two 14mm bolts. Use a 14mm deep socket to remove the last water pump bolt. Remove water pump. Spend about an hour trying to get the old gasket material off the pump and block. You'll need new gaskets for installation. Next remove the coil wire and set aside (you may have done this earlier, as it makes removal of the air pump bracket easier). Now, looking down at the Optispark, you'll notice that below the Optispark are the three "prongs" that hold the harmonic balancer pulley. You'll also notice that the Optispark will only slide off if two prongs are pointing up, and one pointing down. You may have to get under the car and use that 14mm socket and a breaker bar to turn the engine over a little until you get it lined up. Now, remove the three (I think 10mm) bolts that hold on the Optispark. Pull it straight out toward the front of the car. You may have to tilt the top out a little more since it will still hit the main shaft at the bottom. Don't worry about lining it up; it is indexed so it will only go on one way.
You can take it apart and clean it, or but a new one. Up to you. It really isn't complicated at all inside there, so if you have the time, I'd try cleaning it first expecially if it looks dirty. I removed a torx screw from an old carburetor to remove the Optispark inverse-torx bolts. I held the screw with vice grips and they unscrewed no problem. Once the screws are out, and you remove the (really small) torx bolts holding the rotor on, the back just pops off. Inside (under the rotor) are two really thin metal discs. The bigger one has 360 slots and easily pops off for cleaning (be careful not to bend though). The 4 wire connector is actually the optical pickup. The outer edge of the slotted disc passes through a slot in the optical pickup, which reads the slots. Basically, just clean everything and sand off the rotor and contacts just enough to get the gunk off. Things were pretty rusted in mine, so you could get the rust off too. Probably wouldn't hurt to spray everything with Ether (starting fluid) to get the moisture out. As for cleaning the optical sensor, probably a little piece of sterile gauze dipped in alcohols would do. Just slip the gauze through the slot where the disc turns and slide it back and forth. Make sure no pieces of gauze remain in there though. As I said, I didn't bother doing this, because I wanted to guarantee I only had to do this once... and... I think I ruined mine anyway with another untoward procedure... which... um... I won't go into here.
A method of cleaning loose particles from the Optispark without removing it is possible on 95+ cars. If you are going to have to remove/clean it anyway, you could try blowing some pressurized air through the vent hose(s). To do this, remove both vent hoses. One slips into your intake with a blue elbow. The other is on the drivers side edge of the intake. It has two one way vacuum valves in it. Disconnect this one in front of the blue (bigger) valve, so that you have two hoses running to/from the Optispark with no valves connected. Blow air into the one you disconnected from the intake (blue elbow). The air will come out the other hose. It is important that you blow into the hose with the blue elbow because of the way the Optispark is designed. Blowing into this hose will cause turbulence inside the Optispark that will cause any particles dislodged to collect at the other hose, and be blown out. :) Now, I tried this and it seemed to help a little, but I didn't have a compressor. All I could use was a vacuum cleaner set to blow out. Needless to say, it was lame. I think the compressor would do a better job, and I don't think there's anything you could break by doing this. Just make sure that you didn't blow off the hose (look underneath) when you are done. And just a little hint... don't ever, by any means, feed any type of liquid in there in hopes of remotely cleaning it. No matter how evaporative the liquid is, you'll never get it all out! :(
The installation is basically the reverse of removal. The whole thing took me about 6 hours. Have fun guys, and don't let it discourage you. It's really not that bad. Just a bunch 'o bolts. ;)
Mike Chaney, 95 T/A
